To find out more about Save Emails as Dropbox, click here.
To install Save Emails as Dropbox, click here.
To access Save Emails to Dropbox dashboard, click here.
To install Save Emails as Dropbox, click here.
To access Save Emails to Dropbox dashboard, click here.
Introduction
cloudHQ Save emails to Dropbox lets you automatically save all emails from a specific label and its sub-labels to Dropbox or a Dropbox team folder. This is great for saving a lot of emails or for setting up ongoing email saves to Dropbox.
For instance, if you have a label named !Clients, you can automate saving all emails under this label directly to a Dropbox folder.
Here are some reasons why this could be beneficial:
- Backup and Archiving: Automatically backing up emails to Dropbox means you have a secure, accessible archive of key communications. If your email server goes down or emails get deleted by mistake, having a real-time backup on Dropbox lets you quickly get back crucial data without any loss. This is especially critical for important labels like “!Clients,” where losing emails could impact your business heavily.
- Organization and Accessibility: By saving all emails from a label to Dropbox, you can better organize outside your email. This makes it easier to find particular emails or attachments without digging through a messy inbox. Dropbox’s search features and folder setup make this even simpler, especially for large volumes of emails.
- Collaboration and Sharing: With emails saved in Dropbox, sharing and collaboration become easier. For businesses or teams, this means everyone can access client or project emails without having to forward or cc multiple emails. This makes internal communication smoother and ensures everyone is on the same page, which is great for managing projects or client relationships.
Setup Steps
Follow these steps:
- Start the synchronization wizard to sync two cloud accounts:
- Click the Gmail icon:
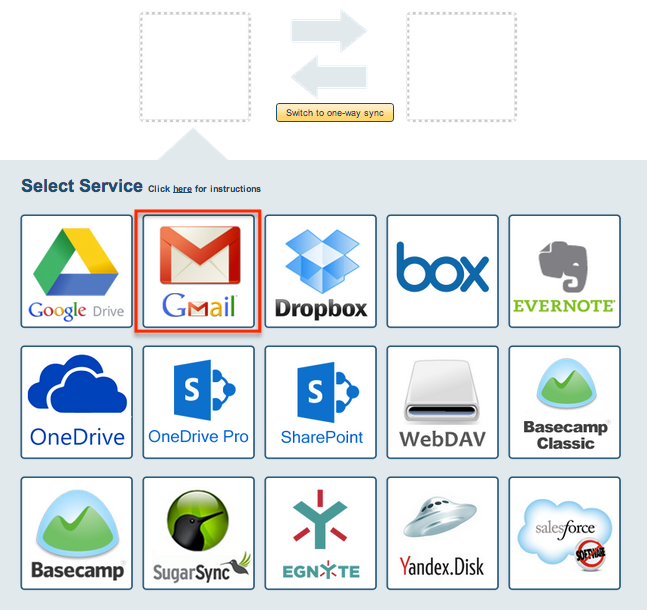
- Select an already-configured Gmail account or click “Add Gmail” to add a new Gmail account:

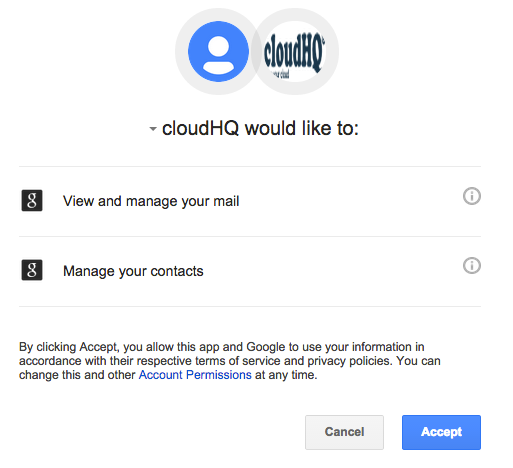
- If you click “Add Gmail,” you’ll be taken to a page to allow cloudHQ to access your account:
- Click on the Switch to one-way sync button so the arrow points from Gmail to Dropbox.
- Select Save or sync all emails in a Gmail label (and sublabels) to your cloud storage then click “Next Step”:
- Select the Gmail label with emails you want to save.
- Click on the Dropbox icon
- Select an already-configured Dropbox account or click Add Dropbox to add a new Dropbox account
- If you click Dropbox, you’ll go to a page to allow cloudHQ to access your account
- Select the Dropbox folder where you want to save your emails, or create a new one, then click “Next”:
How to Monitor Sync Status
Follow this link for instructions on how to check your sync status: How to Monitor Status of Sync.